How to Make Clay Jewelry
Clay Jewelry: How to Make Earrings and Pendants That Don't Look Like Middle School Projects

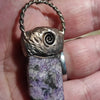
Three stones, three surface treatments, a single tool. Both the spiral and the diamond pattern were stamped with Relyef tools. - Jaroslav Tomek.
A tiny piece of clay, two minutes of work. Yet on an earring, every single flaw shows / every fingerprint, every smeared edge, every slight imperfection that would go completely unnoticed on a large bowl.
Jewelry is a strict teacher. It's far less forgiving than a mug you evaluate at arm's length. People inspect jewelry up close. But when you get it right, it delivers the fastest gratification clay can give: you cut ten pendants from a single slab, and a single firing yields gifts for your whole family.
Here at Relyef, we originally designed our stamps and rollers for classic pottery. But then we started receiving photos of earrings, beads, and pendants made from porcelain, polymer clay, epoxy putty, and metal clay. Because jewelry has its own set of rules, we put together this guide on what works and what to watch out for.
Why Jewelry Is Different from a Mug
When working on standard-sized pottery, you pick a stamp based on the motif. With jewelry, scale dictates everything. A pattern that looks delicate on a dinner plate will suddenly feel coarse and illegible on an earring measuring 25 mm (1 inch) across.
Follow this simple rule: the smaller the piece, the smaller and simpler the motif.
-
Earrings and small pendants (up to 25 mm / 1 inch): Mini stamps 6-8 mm (1/4-5/16 inch), simple symbols, runes, or initials.
-
Larger pendants and brooches (25–40 mm / 1–1.5 inches): 15 mm (5/8 inch) stamps or smaller sets in the 26 mm (1 inch) size range.
-
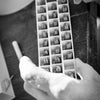
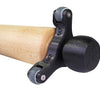
Bracelets, rings, and strips: Texture rollers - their 14 mm (1/2 inch) width fits the band of a bracelet precisely.

Every detail is visible on jewelry, so your stamped impressions must have crisp, clean edges. A spiral measuring roughly 10 mm (3/8 inch) across is ideal for a small pendant.
(If you have never worked with stamps before, start with our guide on preparing clay for stamping.)
Ceramic Jewelry Step-by-Step
1. Select the Right Clay Body
Choose the finest clay possible - porcelain or a fine white earthenware without grog. Aggregates in coarse chamotte break fine detail, leaving "jagged" edges along the impression. Furthermore, translucent porcelain shines beautifully after firing, providing a smooth surface where glazes pool like glass.
2. Roll a Thin Slab
Aim for a uniform thickness of 2-4 mm (1/16–5/32 inch) for pendants. Keep in mind: the thinner the slab, the more prone it is to warping during drying. Conversely, thicker pieces feel heavy - an earlobe will notice the extra weight within an hour. Use a Manual Slab Roller or rolling pin to ensure consistent thickness; variable thickness causes uneven drying and warping.
3. Stamp Your Pattern
Stamp when the clay is between soft and soft leather-hard. Soft clay sticks to the tool; clay that is too dry will micro-crack around the impression.
-
Lightly dust the stamp with talc or cornstarch to prevent delicate clay bodies from picking up inside fine details.
-
Apply firm, perpendicular pressure in a single stroke. Avoid rocking the stamp - on a small motif, any movement creates double lines. High-quality stamps designed with proper draft angles make releasing easy.
-
When using a texture roller, execute a smooth, continuous pass from start to finish without pausing.
4. Cut the Shape and Punch Holes Immediately
Always cut out shapes after stamping. Pressing a stamp displaces clay outward, which deforms pre-cut outlines.
Punch hanging holes in raw clay after stamping. Always make holes larger than the target jump ring: clay shrinks during drying and firing - typically 10-15% depending on the body. A hole that looks exact now will shrink too small for hardware after firing.
Sequence matters: apply the decoration first, then punch the hole, then cut the outer contour. If you press a stamp next to an open hole, the pressure collapses the opening. If design layout requires punching holes first, insert a temporary filler - such as a drill bit shank or a wooden skewer - to support the hole during stamping.
5. Dry Slowly Under Compression
Small, flat ceramic pieces warp easily. To dry pendants flat:
-
Cover them loosely with plastic film or sandwich them between two plaster boards.
-
Alternatively, dry them under light weighting (a plaster tile or small wooden board).
-
Never dry pieces directly on radiators or in direct sunlight.
6. Clean the Edges
Softening sharp edges left by cutters is mandatory for wearable items. Sponge the edges gently at the leather-hard stage, or smooth them with fine sandpaper before the bisque fire.
7. Apply Glazes That Highlight Relief
Bring out the texture using contrast:
-
Coat the entire surface with an oxide wash or dark underglaze.
-
Once dry to the touch, wipe the raised relief surfaces with a damp sponge.
-
The pigment remains in the recessed impressions, making the pattern pop.
-
Finish with a thin layer of transparent glaze; heavy glaze application fills and obscures fine detail.
Leave the backs unglazed, or suspend the jewelry on kanthal wire during the glaze firing - threaded through the hanging hole and spanned between two kiln posts. This allows complete glazing on both sides without sticking to the kiln shelf. Beads are fired using the same wire-suspension method.

Ceramic components after glaze firing. Holes remain sized appropriately after shrinkage, and unglazed backs prevented fusing to the shelf.
From the Relyef Workshop: Small Pieces, Critical Errors
Tomáš advises: "The most common mistake in ceramic jewelry? The hanging hole. People make it exact, it shrinks during firing, and the jump ring won't fit. I always size holes larger - often up to 50% larger than needed. Watch your sequence: if you punch a hole first and stamp afterward, the stamp's pressure deforms the opening. Stamp your pattern first, then punch the hole. If you must pre-punch, keep a filler inside - like a drill bit shank or skewer - and pull it out after stamping."
Věra adds: "Jewelry is an excellent introductory project for pottery workshops. In a single afternoon, every student finishes three or four completed pieces instead of struggling with a single mug. I hand students mini stamps and encourage them to build composite patterns using multiple motifs - it immediately shows who has an eye for layout."
Working with Polymer Clay (Fimo, Cernit)
Polymer clay captures sharp details, doesn't dry out while working, and allows unhurried assembly.
-
Thickness: 2–3 mm (1/16–1/8 inch) for earrings; 3–4 mm (1/8–5/32 inch) for pendants.
-
Release: Dust the stamp with cornstarch or lightly mist the polymer surface with water. If polymer clay becomes overly soft, let it rest in a cool place to firm up for cleaner impressions.
-
Edge Finishing: Polymer clay can be wet-sanded using fine-grit sandpaper after curing.
-
Patina: After curing, rub acrylic paint into the relief impressions, then wipe the top surface clean - the same accentuation principle used with ceramic underglazes.
Tip: Never bake Relyef stamps or rollers in the oven. Our tools are manufactured from eco-friendly bioplastics and bio-resins that warp under heat. Bake only the finished polymer pieces. Wash your tools using lukewarm water and a soft brush before clay residues set in fine details.
Stone Setting with Epoxy Putty

Two-part self-curing putty. Mix components A and B to get a few hours of working time - no kiln or baking oven required.
Want to set a stone without soldering equipment or metalsmithing tools? Two-part epoxy putty (such as Apoxie Sculpt) offers a simple alternative. Artist Jaroslav Tomek uses our stamps on epoxy putty under his brand Autorský šperk Sirius - his pendants are featured in the photos.
Mix equal parts of components A and B, wrap the putty around the top portion of the stone, and press your stamp into the soft material. The putty cures hard at room temperature without heat, making it an ideal pairing for our bioplastic tools.
-
Lightly wet the putty surface with water or a damp finger before stamping to prevent sticking and ensure a smooth finish.
-
Embed a wire bail directly into the putty while it remains soft; it locks in place once cured.
-
Hang pieces to cure rather than laying them flat, preventing flattening on the back impressions.
-
Finish the surface using metallic paints. Jaroslav applies copper and silver tones over the entire bezel, then wipes the high points or applies a dark wash in the recesses to emphasize depth.

Pre-finish state: The uncured white putty holds a clean spiral impression down to the innermost coil. Pendants cure suspended to prevent distortion. (Jaroslav Tomek)
Tip: Make pendants double-sided. Stamp a spiral on one side and a diamond pattern on the other so the wearer can flip the piece depending on their mood.Geometry meets nature: A crisp diamond pattern in metallic copper alongside an organic fossil coral texture.

Silver Clay (Metal Clay)
For precious metal work, our stamps work directly on silver and bronze clay, which fire into pure metal. Metal clay demands precise execution: roll thinner slabs, make shallower impressions, and use generous release agent on the stamp.
Personalization: Custom Jewelry
Initials on a pendant, a date on a christening keepsake, or a runic symbol matching an astrological sign transform functional items into meaningful gifts.
Jewelry requires compact lettering sets:
-
-
Futura Alphabet Stamps, Marion Alphabet Stamps, and Lithos Alphabet Stamps in 10 mm (3/8 inch): Designed for initials and short names.
-
We explain how to arrange letters into a straight line and why our stamps do not get clogged in the Project Alphabet article.
Starter Toolkit for Jewelry Makers
-
-
-
-
Organisers for Clay Stamps / Box with Organisers for Clay Stamps: Essential for keeping small tools organized.
-
Workshop Essentials: Talc/cornstarch, shape cutters, skewers or drill bits for hole punching, and a fine sponge.
Join Our Community
Do you make jewelry using clay, polymer, or metal clay? Send us photos of your work - we love showcasing how makers use our tools beyond the pottery wheel.
Have questions about making jewelry with our tools? Drop a comment below - Věra and Tomáš are happy to help.
Want to introduce jewelry making to your pottery classes? It's an ideal entry-level project - fast, light on clay consumption, and every student leaves with a finished piece. Equip your studio with our mini stamps and texture rollers.
Are you a studio owner or instructor? Join the Relyef Studio Partner Program (RSPP) to receive a 20% studio discount on tools, offer your students a 10% discount, and earn a 10% commission on purchases made through your link.