Wood Makes Sense. Even in Your Hand
When we started years ago by building our own kilns and eventually secured our patent for the SVS Tabletop Slab Roller, we knew one thing from the very first sketch: the heart of the machine had to be solid wood. Not for aesthetics, but because of how wood interacts with wet clay. It balances moisture, prevents sticking, and leaves no canvas texture behind.
Our technical expertise and manufacturing precision even led us to collaborate with NIDEC SHIMPO, a global leader in ceramic equipment, manufacturing adapters and accessories for their machinery.
Then came the question you kept asking us: "What if I need to roll out a small piece of clay directly on my table, but want the exact same smooth finish as a large slab roller?"
So, we expanded the tool family. Same hardwood, same natural oil and wax formulation just sized for your hands.
Ergonomic Manual Slab Roller: Engage Your Shoulders, Not Your Wrists
A standard rolling pin forces you to push straight down using your wrist joints. With firm clay, that’s not just exhausting; it’s imprecise. As your arms tire, your pressure becomes uneven, and your clay slab shows it.
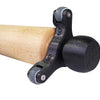
We designed our base wooden Rolling Pin from a joint-biomechanics perspective. The handles are shaped and angled so you can transfer your core body weight through your arms and shoulders. Rolling becomes fluid, requires far less exertion, and gives you subtle control over how much you compress the body.

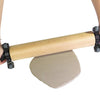
Just like our SVS Tabletop Slab Roller, you roll directly on the clay - no canvas, no extra mats needed. The resulting slab is smooth and immediately ready for stamps and texturing.
Adjustable Roller (4 / 6 / 9 mm): Three Thicknesses in One Turn
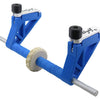
If you build boxes, vessels, or tiles, slab thickness isn't a detail - it’s a structural tolerance. We took our ergonomic handle design and engineered an adjustable pin with three built-in depth settings.

Forget hunting for loose guide strips that slide across your bench. With this pin, a single motion sets your gauge:
Turn the pin, and you have an exact 4 mm (0.2 in), 6 mm (0.2 in), or 9 mm (0.4 in) clearance along the entire slab length, every single time.
Why 4, 6, and 9 mm?
These dimensions aren't random. They come directly from practical studio construction:
-
4 mm (0.2 in) - Thin and malleable: Ideal for pendants, ornaments, name tags, and small press-molded bowls. The slab holds its structure while curving without tearing. Going below 4 mm with standard clays risks stress fractures during bending.
-
6 mm (0.2 in) - The versatile workhorse: Perfect for box construction, angular forms, plates, strainers, and joined slabs. If you're unsure where to start, pick 6 mm. It resists warping during drying while keeping the piece lightweight.
-
9 mm (0.4 in) - Built for load-bearing: For large surfaces, architectural tiles, outdoor pieces, and heavily grogged clays. Coarse grog slabs tend to crack if rolled too thin; 9 mm gives the clay the structural integrity it needs. When building vertical volumetric forms, the slab must support its own weight without slumping.
The difference between 6 mm and 9 mm doesn't feel like extra physical work in your hands, but you will notice the structural difference immediately after firing.
Maintenance: The Same Routine as the Machine
Our rolling pins are crafted from the same premium hardwood and sealed with the same natural oils and waxes as our patented slab roller. That means maintenance is simple and takes less than two minutes:
-
Pure Linseed Oil: Apply a thin layer once or twice a year - ideally right before the heating season starts. Let it absorb into the wood grain, then thoroughly wipe off any excess.
-
Pure Beeswax: Apply roughly once a month during heavy studio use. If you work with sticky, high-plasticity clay, wax keeps the surface releasing smoothly. Polish with a soft cloth to a satin finish.
Tip: Never submerge wooden tools in water, rinse them under a running tap, or dry them near a kiln or radiator. Scrape off dry clay using a dry stiff brush or a damp sponge, then wipe completely dry immediately.
Tip: Never leave linseed-oil-soaked rags bunched up. As the oil oxidizes and dries, it generates heat and can spontaneously combust. Always lay rags out flat to dry or submerge them in water.
A compact, precise workshop partner that fits in your hand or your travel kit - and with basic care, it will last you decades.
Handheld Roller vs. Machine: When Does the Hand Tool Make Sense?
Let’s be realistic -the SVS Tabletop Slab Roller is in a different league for production volume. But not every potter needs a full station right away.
-
Investment: A manual slab roller costs a fraction of a full-sized slab roller. For anyone discovering if handbuilding is their path, it’s an accessible entry point.
-
Footprint: A slab roller claims permanent real estate on your workbench. A manual roller hangs on a pegboard, fits in a drawer, or slides into a bag for workshops.
-
Setup: No heavy lifting, no adjusting mechanical gantries. You pick up the pin, roll your slab, and keep working.
When you need large slabs, production batches, or continuous workflow, stepping up to the SVS Tabletop Slab Roller is the natural move. Until then, a manual roller gives you the exact same wood-to-clay benefits in a portable format.
From the Relyef Studio
Tomáš notes: "When you roll clay by hand for hours a day, every detail matters. Rotating the roller to hit an exact 6 mm depth without searching for wooden slats is one of those small shop efficiencies that keeps your momentum going."
Radovan adds: "When engineering the handles, we focused on the vector of applied force. We designed the grips so the force vector bypasses the small wrist joints and transfers naturally from your upper body."
Wood on Wood: Turning Smooth Slabs into Bark Textures
Once you have a smooth slab free of canvas marks, you can introduce surface depth.
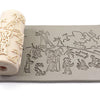
Complementing our slab rollers, our range includes wooden texture rollers. Rolling them over a smooth slab impresses clean, deep textures - from tree rings and bark to natural grain fissures. The contrast between a perfectly flat base slab and a rich wood texture creates striking depth when highlighted with oxides or glazes after firing.
A smooth base next to deep relief - that is the whole principle.
-
Posted in
ceramics, class, clay, creative, Relyef, Slab Roller, Wood Roller