Ocarina Workshop: The Sound of Clay
Make a real instrument that plays!
As a ceramicist, there is nothing quite like the moment a piece of clay finds its voice. This workshop is designed for schools, community centers, and studios that want to bridge the gap between traditional craft and precision engineering. By using our specialized system, you ensure that every student walks away not just with a souvenir, but with a functioning, tuned musical instrument.
Watch our reel to see the process!
The Hero of the Set
The Relyef system uses a precision master model and high-quality Ocarina moulds. This combination guarantees repeatability, proper ergonomics, and most importantly acoustic success. It provides the consistent results that teachers and studio owners need when guiding beginners.

What’s Inside the Kit
A) The Core Ocarina Kit
-
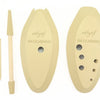
Ocarina moulds: A two-part system (top and bottom) to form the instrument's body.
-
Calibration Tool: For precisely enlarging and tuning the holes.
-
Calibration Mouthpiece Tool: Defines the exact size and angle of the windway.
What to prepare for your workshop (not included):
-
Hole Punch: For quick, consistent initial finger holes.
-
Separation Foil: We recommend thin stretch wrap for easy release and a clean workflow in a classroom setting.
B) Optional Professional Add-ons
-
Handheld Extruder: Use compatible die sets to quickly create mouthpieces or decorative reinforcements.
-
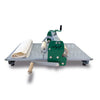
Harp Cutter: Essential for cleaning edges and leveling joining surfaces perfectly flat.
-
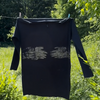
Musical Note Stamps: For thematic decoration that adds an instant "wow" factor.
-
Courier Alphabet Stamps: Perfect for personalizing the instrument with names or school dates.
Step-by-Step Guide: From Clay to Music
0) Preparation
Prepare a soft, homogenous clay body free of air bubbles. Apply your separation foil (stretch wrap) to the Ocarina moulds to ensure the clay releases quickly without sticking.
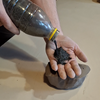
1) Forming the Body
Press the clay firmly into both halves of the mould. Ensure the wall thickness is consistent throughout. Use your Harp Cutter to trim the excess clay flush with the mould edge.


2) Assembly
Score and slip the edges of both halves and join them. Use the Harp Cutter or a modeling tool to clean the seam. Let it sit for a few minutes to "firm up" so it maintains its shape during the next steps.
3) The Mouthpiece (The Key to Sound)
Use the calibration tool to set the angle and size of the windway.


Tip: The mouthpiece is 80% of your success. If the instrument doesn't play, the issue is almost always a blocked or poorly angled windway. Recalibrate until you get a clear, stable tone.
4) Finger Holes
Punch the initial holes using the hole punch. Then, use the tapered tool to gradually enlarge them. Focus on ergonomics, position the holes where the fingers naturally rest based on the guides provided in the mould.

5) Tuning
Open a tuner app on your phone. First, stabilize the root note (the "all holes closed" note) via the mouthpiece, then tune the finger holes one by one.

Tip: Remember the golden rule: enlarging a hole raises the pitch. You cannot "un-enlarge" a hole, so work slowly in small increments.
6) Personalization
Once the instrument plays correctly, add your decorative touches. Use Musical Note Stamps or Courier Alphabet Stamps for names or class years.
7) Drying and Firing
Dry the ocarinas slowly and evenly under plastic wrap. Pay close attention to the area around the mouthpiece and the center seam, as these are the most prone to cracking.
Troubleshooting
-
No sound or airy tone: The windway angle is wrong. Re-insert the calibration tool and adjust.
-
Off-pitch notes: Inconsistent wall thickness or a leak in the seam. Seal the seam and smooth it over.
-
Poor ergonomics: Holes are too far apart. Always use the template provided in the mould before punching.

I would like to buy the mould for the ocarina is that possible please
I live In Sydney Australia