Discover the Stories Beneath the Surface: Texture as Clay’s Secret Language 🐞
Beneath the bark of trees lies a hidden world. Beetles and larvae carve delicate tunnels, each groove telling a story of life, time, and transformation. Age rings, knots, cracks, and growth spurts all weave together into a natural tapestry. Just as wood carries traces of history, clay can hold the memory of nature—if you know how to bring it to life.
This is where Relyef tools come in. They give even beginners the ability to create textures and clean joins that look professional, allowing every piece of clay to tell its own story. With these tools, your creations can carry the intricate detail of the natural world, while remaining precise and durable.
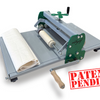
1. A Solid Foundation with the Relyef Slab Roller
Before diving into textures, start with a consistent base. The Relyef Slab Roller produces perfectly even sheets of clay—essential for boxes, tiles, or any piece with walls and corners. Consistent thickness prevents warping or cracking during drying and firing.
💡 Tip: Roll your clay to about 10 mm for sturdy walls. For added character, place a lightly textured cloth under the slab to leave subtle natural grain patterns. This gives the surface a tactile quality that mimics real wood.
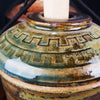
2. Textures That Tell a Story – Relyef Decorative Rolling Pins
Now for the magic: adding texture. Relyef decorative rolling pins allow you to press organic, tunnel-inspired patterns into the clay without stretching or distorting it.
Follow the imagined paths of beetle tunnels—curves, spirals, and irregular lines that feel alive.
Don’t forget the edges; rolling along the ends ensures the pattern continues seamlessly.
Experiment with pressure: lighter rolling creates gentle impressions, while firmer pressure gives deep, dramatic grooves.
By texturing before cutting, your pattern stays crisp and detailed, ready to shine in the finished piece.
3. Cuts That Look Professional – Relyef Harp Cutter
Once your slab is textured, it’s time to cut. The Relyef Harp Cutter makes clean, precise slices, ideal for walls, lids, and bases.
Cut long, continuous pieces, then slice to size for minimal clay waste.
Right-angle cuts ensure tight corners and flat planes.
Using a harp cutter saves time and improves accuracy compared to knives or hand tools, giving even beginner projects a professional feel.
4. Strong Joins with Scrapers & Modeling Tools
Properly joining pieces is key to structural integrity. Use Relyef scrapers that are included in the Baroque stamps and cutters set to score surfaces, apply slip, and press the parts together firmly.
Reinforce corners with small clay coils, smoothing them with a modeling spatula.
Refine with a soft brush or damp sponge for seamless edges.
This method preserves the texture, ensuring your box is both beautiful and durable. Every groove remains visible, and the joins blend naturally into the design.
5. Final Touches – Highlight or Subdue Texture
Even after construction, texture can be enhanced or softened.
Roll edges with a Relyef wormhole roller to bring out the details along rims or corners.
For contrast, gently polish certain areas with a soft tool to create highlights.
These subtle variations add depth, mimicking the layers and imperfections of real wood, and making your piece feel alive.
clay.
6. Safe Drying to Prevent Cracks
Drying is a crucial step for keeping your piece intact.
Invert your box so the base is up; gravity will help maintain shape.
Add clay feet to create airflow underneath and encourage even drying.
Use breathable surfaces like wooden slats or plasterboard. For delicate shapes, sandwich your piece between rigid boards with perlite for gentle support.
Following these steps reduces the risk of warping or cracking, giving you a strong, well-formed piece ready for bisque firing.
7. Glazes That Hide Secrets
After bisque firing, choose glazes that enhance your textures.
Feldspar-based glazes with a matte satin finish work beautifully on organic patterns.
Rub in cobalt- or oxide-stained perlite between layers for hidden bursts of color. These little surprises peek through grooves, adding depth and intrigue.
The textures made with Relyef rolling pinscatch glaze in different ways, emphasizing every ridge and valley.
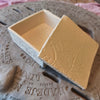
8.The Result? A Unique, Story-Filled Piece
Each box created with this process carries subtle variations from the way the rollers are used, giving your piece a distinctive, hand-crafted feel. The combination of natural texture, layered glaze, and precise joinery creates a piece that is both tactile and visually captivating.
Your textured box could serve as:
A container for studio tools, keys, or keepsakes.
A candle holder that glows from within, highlighting carved grooves.
A jewelry box with hidden cobalt touches that catch the light.
Let the texture guide your imagination—each groove can spark a story.
Explore the full Relyef range at our e-shop. Sign up for our newsletter for tips, sales, and first access to new textures and tools.
Final Thoughts
Texture isn’t just decoration—it’s a story. With Relyef tools, you can capture the hidden world beneath the bark, bring it into your clay, and create pieces that are as unique and alive as nature itself. Pick up your slab roller, roll, carve, and let your next masterpiece tell its story.


